Monday 30 December 2013

phantom finished

got some shading wash's done on Tatu but still gotta bring up the midtones.
as well got all the varnish cotes done on the The Phantom. the sword looks abit better now


Sunday 29 December 2013

EOD Tatu begins

I finished working on the sword and got the Phantom GlossCote'd and it should be dullcoted tomorrow.

I moved on to Basecoating Tatu the Half Vampire. I pretty much stuck with the cannon color scheme for her.
I used Soft Blue for her shawl and nightmare black for the hair..a mix of splattered crimson and imperial purple for the maroon corset, vampiric shadow for the petticoat and tanned skin and Army Painters Gunmetal for the gun and knife.

Heres progress so far.


The Phantom detailing

spent some more time doing the highlighting and detailing.
I ended up adding some marigold yellow(orangie yellow color) to the fresh blood to do the last slight highigts on the cloak..they're hard to see but I think they work without changing the tone of the cloak to orange to much.
for the leather trim i used lonestar leather over the russet brown and just added some linen white to the lonestar for the highest color on the mask strap and glove.
used some gw auric armour gold on the handle and cloak buttons then used armor wash to shade them and some newgold and pearl white to highlight.
The sword I used runefang steel some washes to shade and tried to use polished silver to highlight but I'm really struggling with the brighter colored reaper metalics..they seem more flat then metalics..I love all the other paints but something about the metalics aren't working well for me.
reguardless the sword needs some more blending between the shading and the brighter silver..its abit to abrupt .

for the black boots and shirt and cloak collar I just used noir black and blended in some stone grey progressively till just a touch of line white and stone grey for the tips.
for the hair I mixed some lone star leather and marigold for the mid tone and then some linen white to it to highlight the hair..seems pretty good as a sandy brown coloring


so here it is pretty much done except some tweaking of the sword.


Friday 27 December 2013

The Phantom Continues

So I applied some shading wash's and let them dry..then build the midtones back up then moved to detailing and highlighting the face I used tanned skin for the mid then tanned highlight for the highlights then a slight dab of linen white added to the tanned highlight.
I used abit of diluted red wash on the creases of the burned part of his head tho it doesn't show up well in the pictures.
after that I didn't do a lot with the pants other then cleaning up the midtown and slight highlights on the creases.

for the cloak I used blood red for the mid highlights up to fresh blood for the brightest..I might need a bit brighter jsut at the edges but I dont' want to turn it pink.

The mask i used yellowed bone then highlighted up with some linen white up to pure white.

Still lots to do but here is  progress for the day.No sure if I can get in anymore brush time till Sunday but I'll update if it happens.


Progress so far


EOD The Phantom begins

so I've run out of assembly supplies before finishing all the  Blackwater Gulch figures..still got about 12 figures to go..but almost there.

Overall they are pretty good tho there is definitely some scale issues..it seems the Secret fist was scaled down too small from their 3D master by about 10 percent ..they are abit on the tiny side..there's one giant fella in the Dockside drifters but otherwise they are pretty good.

I think due to using 3d modeling, instead of traditional sculpting, some of the details like gun barrels are abit to fine and will likely break off sooner then later..but beside these minor things they look great.


once I get some more superglue and plastic cement I'll finish assembly  but for now Gonna try and get back to painting.
I've finished basecoating the Phantom used gory red for the cloak, yellowed bone for the mask,vampiric shadow for the shirt cuff,russet brown for the leather,hair and gold undercoat and finally dusty skin for the pants(apparently my new favourite pants color heh)

next up doing some shading wash's then rebuilding the midtones after the wash's.


Monday 23 December 2013

back to arts and crafts

Its abeen a while since I painted anything and  I guess its time to get back to the paint blog.
I finished up a unit of reserve artillery 152mm for my Flames of War Soviets and then came to the conclusion im never gonna get to play any of the games from the kickstarters I supported unless I assemble them first and paint them later.


So I've gone thru and based and assembled all the Empire of the Dead figures I got. I realize now I should have bought the regular bobbies as well as the special branch ones..but live and learn

The bobbies I do have I used army painters ultramarine blue primer on them the rest I used a dark grey sandable primer then used white primer from above down on to them to create a black and white highlight area..I always wanted to try that tecnique and I think it looks great for playing till I get to painting them.


next up I need to assemble all the Blackwater Gultch figures and try and decide how I'm gonna base bones for Warlord..just build up around the bones integrated bases or cut them off and do sculpted ones

Friday 22 November 2013

Olde Towne Test building roof

So I printed off the roof at 105% the default size..and decided to try and figure out a way to do the roof in one piece and not cut it apart.
So I left about 1inch of paper around the print out edges and scored the centerline crease folded and used the marker to cover over the white paper edge.
Then I took a foamboard panel thats about 3/8s of an inch tobig and lined it up right against the crease (held the roof paper at 90degrees)
with that glued down and dried i then glued the other side of the roof to the underside of the paper..using a spare piece of foamboard as a spacer to ensure the proper armount of room for the fold.


once the second section was glued down I removed the spacer and let it dry.


after that dried I flipped it over and used the hobby knife to cut the whole thing to its finished size and a clean edge all the way around.


you can see when by hand you lift the edge up you get a perfectly fitted right angle to glue while keeping the roof printed paper a single piece.


so then put a bit of glue on both sides of the rabbet and glued in two support pieces that fit just inside the buildings peaks.
and let it dry


the roof fits pretty good but I did find one issue the extention to the font and the back isn't quite enough the lip of the roof catches the edge of the front and back wall. I think If I printed the roof off at 110% for the next one it would fix the issue.
Over all tho it doesn't look bad at all.I still have a chimney to add to it..
For the windows I think on the front I'm gonna try adding the whole window as protruding and on the back just try doing the brick above the window and the window sill and see what looks better to everyone.

Heres what it looks like now.


Thursday 21 November 2013

Olde Towne Test Building cont

So got some more stuff printed off and wanted to get the edges of the building cleaned up.
Starting off I cut out the corner joints..using a smooth sculpting tool and a straight edge I scored teh center fold line on the printed side.


This lets you fold the corner piece smoothly but splits the edge abit tho when you fold it.

after folding and while folded over tight i used a black permanet sharpie marker along the edge to cover over the white paper that shows thru along the corner


after that dries I flatten out and use a straight edge and an exacto knife to cut out the white parts...then use  a sharpie to blacken the exposed edges all the away around( its just like lining! LOL)

after that I put a bead of glue down the middle of the paper at the corner and used a Q-tip to spread it out to all the edges smoothly and then just pressed it onto the corner of the building...i got the front two done..I think it really does a great job setting off the corners.

I want to print out the windows but need some cereal box cardboard to glue to to get the proper thickness I think the 5mm foam board would stick out to much.

Heres pic with corner edging.

Tuesday 19 November 2013

Eod First 5

Heres a group shot infront of the building..I think its working out well..

White Rabbit finished

not much different from last one..just some highlighting of the black and some black wash on the metal gun then used runesteel to highlight and buttons

Monday 18 November 2013

whiterabbit highlighting

so i went back and tried glazing the coat with the darkest color then the same for the highlight color n the highpoints..but its still abit rough..grey's a tougher color to deal with then I thought.
I used the Ltpk lauranna hair directions for the hair..which makes a nice strawblond color..then used a blend of bright turquise up to LED blue for the outfit.for the petticoat I built back up the mid tone of yellowed bone then highlights using linen white up to pure white.

I wimped out on trying to paint a rabbit head on the card(just to small a spot) and just went an more easily recognizable Ace of Spades.

still need to work on the cane /gun and the black slacks and sleaves..but its getting close to done.

Sunday 17 November 2013

Olde Towne test building

so I ended up ordering the Olde Towne and Undeveloped Real Estate pdf's from wargame vault. picked up an x-acto board cutter and some foamboard and printed out a basic building.
Over all it works out pretty good. I think I'll print out the windows and glue down on top to give it abit of a 3d look..the plain build is a bit flat.

Only issue I have so far is the roof is to small. I'm gonna print it out again @ about 110% to give it abit of an overhang then mount it on foamboard.

I think  they should work out pretty good for  Empire of the Dead buildings.


Wednesday 13 November 2013

white rabbit shaded

so Rocksmith 2014 has its claws in me..its sooo much better then the original. but its cut down on my painting time..
I  did get some more done..I painted over the coat with rainy grey then I made wash's for the coat the petticoat hair and turquoise pieces.

I got the face detailing done..tho i might need to go back and shade it abit more..I built up the midtone and highlights on the coat..tho I think I need to do a glaze of the darker color to help clean up some of the tranitions..its abit rough atm.

but here she is so far.

Thursday 7 November 2013

white rabbit basecoated

so i ended up going with bright turquoise for the main body color with black and used aircraft grey for the overcoat and hat.
and yellowed bone for the.... well I honestly dont' know what the proper name is for the frilly skirt is :)

the aircraft grey dries more powerer blue then grey..but i'm hoping a dark wash will tone that down the blue... as well the turquiose might be abit to dark for a mid tone but I'll see what I can do..

Wednesday 6 November 2013

Tom Gaunt really Done :)

Here he is all based and dullcoted. Now gotta start working on a color scheme for the white rabbit.


Tuesday 5 November 2013

Tom Gaunt done,The White Rabbit begins.

Go the last of the detail work and the blacks finished on Tom and got him gloss coted and drying till tomorrow to finish basing him.
in the meantime I prepped the next Kickstarter Exclusive Figure...The White Rabbit! she's an illusionist or something..but I thought she looks cool.
due to how thin the highheal shoes are on her I elected to just trim the slot base down to two pegs and use that in the base instead of pinning.
not sure how this will work out painting the base first..but Here goes nothing :)

Monday 4 November 2013

tom gaunt almost finished

used the same process as the last one to clean up the pants not to much to highlight, just tried to give it a bit of a crease highlight since that seemed to work on the last one. for the leather bandolier and whip I  worked it up from ruddy leather to oiled leather.
used some algae wash on the shotgun and some runefang steel for highlighting the metal on the gun and the shells..as well as some new gold for the top of the shells..
Think tomorrow I just need to work on the blacks(gloves,shoes and hat) and it will be done.


Sunday 3 November 2013

Tom Gaunt shaded and face highlighted

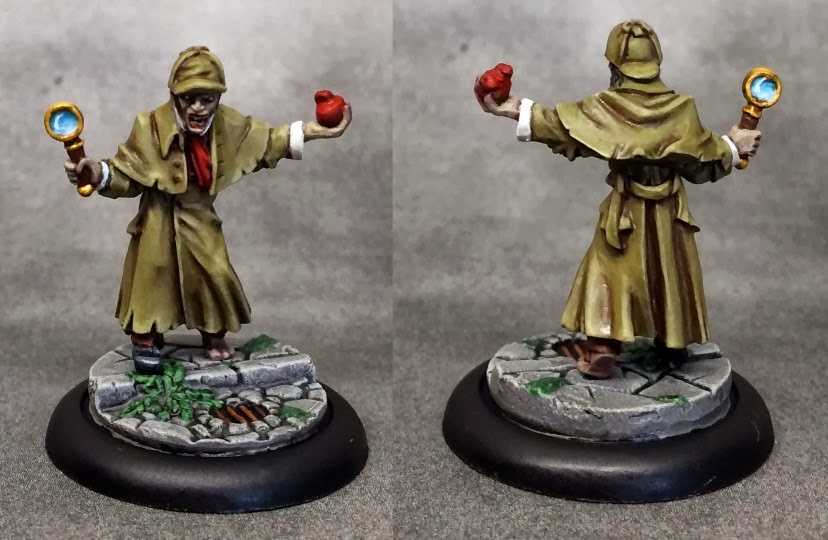
I got all the metal bits painted with the darkest shades of metalics then I used the secret weapon colored washes for the most part to shade everything. I've been making my own washes from the LTPK directions for a while and figured I'd go back and try and see how these work vs making your own.

For the Red I used one drop of Red/Black +1 drop of Softbody black. for the Jacket 1drop of sewer water+1drop of softbody black.As well as the hair.For the wood stake and gun stock just straight sewer water. for the pants I did use a drop of duskyskin mixed with the black since i don't have a premade shade that works with it .and abit of flesh wash under the nose in the eye sockets and deeper cheek and under the chin.

I started doing the facial details..using blacked brown to line the eyes and the iris's and linen white for the whites of the eyes.
built up the facial highlights using the tanned skin triad from shadowed as the basecoat color up to tanned highlights.

for the hair I added more grey to the blond mix for the first highlights and linen white to the mix to work up to a more grey and white hair color..with just a hint of sandy blond left to it. I don't know why but I like it better with grey hair..


I've been wondering if it isn't time I start trying to paint in some eyebrows on figures like this or if its kind of redundant.


I think for the rest of the figure I'm gonna work smoothing the midtones from the shadows and then go directly to highlighting that same section vs doing all the midtone clean up before highlighting

spent some time highlighting the red from the basecoat color of splattered crimson up to fresh blood. I think thats enough..I dont' have a brighter red that isn't a pink.
after that I worked on the coat..building the midtone back up and blending the edges of the shading then building up the highlights from lonestar leather to tanned leather.
I think its enough..i don't want to washout the darker color completely.

next up the pants I think..but gonna leave that for tomorrow.


Saturday 2 November 2013

Tom Gaunt basecoat

got all the basecoat colors applied except the metalics..used the lonestar leather for the duster and splattered crimson for the shirt and hat sash,dusty flesh for the pants again. The last thing was the blond hair..which.was a drop of alien flesh,sun yellow and a small dab of oiled leather. I think i'm gonna work it more towards grey I liked  the  white primer looks better honestly.

I'm sure the bandolier is suppose to be shotgun shells but they really do look more like shells from a grenade launcher LOL.


Thursday 31 October 2013

Jack the Ripper Finished, Tom Gaunt begins!

well i finished up the metals and details and got him based and gloss and dulcoted..turned out ok.the shading on the blade on the back worked better then the front. Over all I'm I like him..not my best but pretty good without spending more time on him then I really wanted to. :)


Next up another Empire of the Dead kick starter exclusive..Tom Gaunt!..not sure his story yet(waiting for the pdf to be  updated..but looks like a vampire hunter to me! While cleaning up the mold lines I broke off the whip accidentally..so I tried pinning and gluing it back together..seems like it will hold but I'll have to be careful


Tuesday 29 October 2013

Jack the Ripper continues

got the flesh and eyes done..tho in retrospect I should have started with a darker color.
I used tanned skin then rosy then fair..I think the base color should have been tanned shadow..I was thinking he should be more pale..but the shadown color is still abit bright.

after that I shaded the pants and jacket with a mix of blackwash and the color of the cloth
for the pants mostly shading the inner thighs and the slight creases. for the jacket the creases and the deeper parts under the arms and on the back under the cloak and crease.

for highlighting the pants I mixed in some vampiric shadow with the dusky skin but only did some slight highlights..I don't want to brighten pants to much and am worried broader more gradual highlights would wash out the color.

for the jacket highlights I've been using blends of screamer pink with blood red then a dab brain pink mixed into that brighter red mix for the final highlights..trying to not turn it all pink or use white..but I might need to use a bit of the darker maroon as a glaze to smooth it out.

Still need to use some grey to highlight the cloak and hat ..after dinner I'll try and tackle that.


tried highlighting the black cloak and hat and shoes. using the noir black ..then adding some stone grey to it ..then the final highlight is just pure stone grey

as well i shaded the hair and the hairline trying to shade the face abit then hightighted the hair and the chain.

metallic shading will have to wait till tomorrow


Sunday 27 October 2013

Jack the ripper basecoated

So I ended up using a maroon color for Jacks Coattails.
Its a 1:1 mix of spattered Crimson and GW's Screamer Pink(which is more purple the pink)
The pants and vest I went with Dusky Skin for  a nice mauve grey color.

theres a bump on the back of the cloak,which i thought was weird crease but I think its actually a molding error..but its in a recessed area thats curved..not sure how or if I should bother with trying to clean it up..looks like it needs a curved blade to ..

anyways here he is so far.


Zombie Watson Finished

so got him based and dullcoted here he is then . As well as The Duo ready for action.


Saturday 26 October 2013

Jack the Ripper begins

zombie watson has a gloss cote drying and should be based tomorrow in the meantime I figured might as well keep this ball rolling and get a real villian done. Jack the Ripper suits the bill!

So cleaned him up and cut off the slot base and glued in the pins
Its raining here so used some brush on primer and a thinned down black wash to try and bring out the details for basecoating.
I'm kinda torn on the colors to use. Alot of figures in this series will have alot of black so was thinking of doing a deep purple suit color and just use black for the cloak thing and hat..maybe red for the bandanna..

Or..it could be that dudes wearing tails,its gotta be black..not sure..thoughts?


Friday 25 October 2013

zombie watson continues

I've tried to blend the soft blue up to mostly ashen blue for the highlights on the suit..I think it looks ok..but i'm not sure if I need to add one more very slight brighter highlight on the tips of peaks..being a suit I'm not sure if that will make it look to shiny

Here he is so far.


applied another layer of highlights to the suit and highlighted the tie and metal bits
i think its better now..not sure if its abit to splotchy tho.


Wednesday 23 October 2013

Zombie Watson continues


So Rocksmith 2014 might be sucking up alot of my paint time LOL..its a blast..much better then the original which is one of the only video games I still play..
Getting some painting in I decided to try abit more olive green in the flesh mix for Zombie watson..to mix it up abit and see how it works out..as well applied abit of white to the mix for the final highlights..I think it turned out ok.

Watsons eyes,.smallest I've ever seen LOL I think the dots will do tho they're abit lopsided.

I applied a mix of blackend brown and soft blue to make a wash and applied to the suit then applied one layer of softblue to buildup the midtone again. Might have to go back and apply one more layer...
so here he is so far.


Monday 21 October 2013

Zombie Watson started

So got Zombie Holmes finished up and started on his partner in undeath Zombie Watson .
Got most of the basecoating done..went with softblue for the suit basecolor..gonna try and bring up the highlights onto that towards grey
I didn't realize he had a stethoscope around his neck at first but once I get some metallics done it will stand out better


Deathlocke Bones finished

Here he is all based..might need another dullcoat since still abit shiny