Thursday 31 October 2013

Jack the Ripper Finished, Tom Gaunt begins!

well i finished up the metals and details and got him based and gloss and dulcoted..turned out ok.the shading on the blade on the back worked better then the front. Over all I'm I like him..not my best but pretty good without spending more time on him then I really wanted to. :)


Next up another Empire of the Dead kick starter exclusive..Tom Gaunt!..not sure his story yet(waiting for the pdf to be  updated..but looks like a vampire hunter to me! While cleaning up the mold lines I broke off the whip accidentally..so I tried pinning and gluing it back together..seems like it will hold but I'll have to be careful


Tuesday 29 October 2013

Jack the Ripper continues

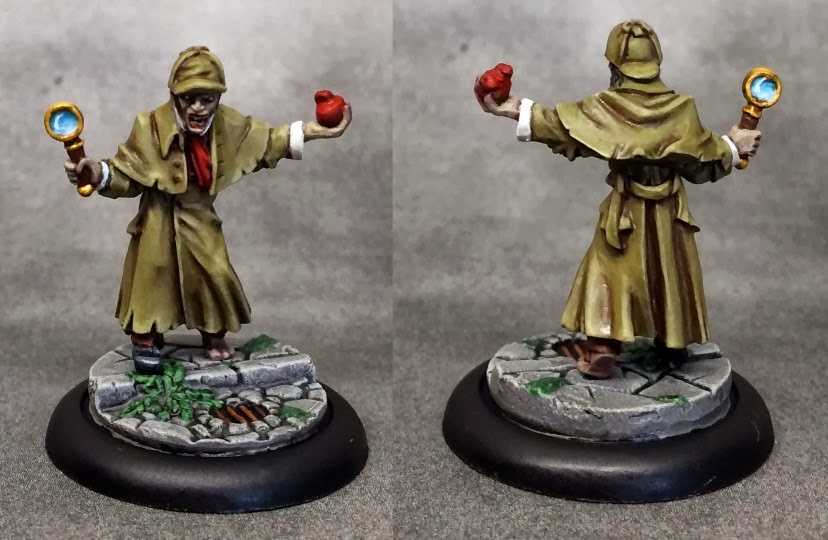
got the flesh and eyes done..tho in retrospect I should have started with a darker color.
I used tanned skin then rosy then fair..I think the base color should have been tanned shadow..I was thinking he should be more pale..but the shadown color is still abit bright.

after that I shaded the pants and jacket with a mix of blackwash and the color of the cloth
for the pants mostly shading the inner thighs and the slight creases. for the jacket the creases and the deeper parts under the arms and on the back under the cloak and crease.

for highlighting the pants I mixed in some vampiric shadow with the dusky skin but only did some slight highlights..I don't want to brighten pants to much and am worried broader more gradual highlights would wash out the color.

for the jacket highlights I've been using blends of screamer pink with blood red then a dab brain pink mixed into that brighter red mix for the final highlights..trying to not turn it all pink or use white..but I might need to use a bit of the darker maroon as a glaze to smooth it out.

Still need to use some grey to highlight the cloak and hat ..after dinner I'll try and tackle that.


tried highlighting the black cloak and hat and shoes. using the noir black ..then adding some stone grey to it ..then the final highlight is just pure stone grey

as well i shaded the hair and the hairline trying to shade the face abit then hightighted the hair and the chain.

metallic shading will have to wait till tomorrow


Sunday 27 October 2013

Jack the ripper basecoated

So I ended up using a maroon color for Jacks Coattails.
Its a 1:1 mix of spattered Crimson and GW's Screamer Pink(which is more purple the pink)
The pants and vest I went with Dusky Skin for  a nice mauve grey color.

theres a bump on the back of the cloak,which i thought was weird crease but I think its actually a molding error..but its in a recessed area thats curved..not sure how or if I should bother with trying to clean it up..looks like it needs a curved blade to ..

anyways here he is so far.


Zombie Watson Finished

so got him based and dullcoted here he is then . As well as The Duo ready for action.


Saturday 26 October 2013

Jack the Ripper begins

zombie watson has a gloss cote drying and should be based tomorrow in the meantime I figured might as well keep this ball rolling and get a real villian done. Jack the Ripper suits the bill!

So cleaned him up and cut off the slot base and glued in the pins
Its raining here so used some brush on primer and a thinned down black wash to try and bring out the details for basecoating.
I'm kinda torn on the colors to use. Alot of figures in this series will have alot of black so was thinking of doing a deep purple suit color and just use black for the cloak thing and hat..maybe red for the bandanna..

Or..it could be that dudes wearing tails,its gotta be black..not sure..thoughts?


Friday 25 October 2013

zombie watson continues

I've tried to blend the soft blue up to mostly ashen blue for the highlights on the suit..I think it looks ok..but i'm not sure if I need to add one more very slight brighter highlight on the tips of peaks..being a suit I'm not sure if that will make it look to shiny

Here he is so far.


applied another layer of highlights to the suit and highlighted the tie and metal bits
i think its better now..not sure if its abit to splotchy tho.


Wednesday 23 October 2013

Zombie Watson continues


So Rocksmith 2014 might be sucking up alot of my paint time LOL..its a blast..much better then the original which is one of the only video games I still play..
Getting some painting in I decided to try abit more olive green in the flesh mix for Zombie watson..to mix it up abit and see how it works out..as well applied abit of white to the mix for the final highlights..I think it turned out ok.

Watsons eyes,.smallest I've ever seen LOL I think the dots will do tho they're abit lopsided.

I applied a mix of blackend brown and soft blue to make a wash and applied to the suit then applied one layer of softblue to buildup the midtone again. Might have to go back and apply one more layer...
so here he is so far.


Monday 21 October 2013

Zombie Watson started

So got Zombie Holmes finished up and started on his partner in undeath Zombie Watson .
Got most of the basecoating done..went with softblue for the suit basecolor..gonna try and bring up the highlights onto that towards grey
I didn't realize he had a stethoscope around his neck at first but once I get some metallics done it will stand out better


Deathlocke Bones finished

Here he is all based..might need another dullcoat since still abit shiny


Sunday 20 October 2013

went back and applied some more highlights to the coat and shaded the bottom and inner area of the cuffs and added some brighter red highlights to the heart and the scarf.
I not sure about adding running blood effects over his hand these guys seem abit cartoony..i think gore  effects might be to much..not sure tho

as well I tried shading and highlighting the magnifying glass abit and the shoe. Overall I think he's pretty much done unless something stands out to anyone that it needs more work.

oh I've never attached a figure to a base like this after painting..should I seal it with a gloss cote before basing..or just glue it down and then seal the whole thing?


zombie holmes continued

went back and applied another layer of midtone then added a little linen white to the mix and applied a slight highlight to alot of the edges.

i think i need to thin it down abit more and do some more broader highlighting ..but I don't want to overwhelm the midtones like i did on bertoks flesh


Saturday 19 October 2013

experimented with trying to create a rounded glass effect for the magnifying glass.its a little rough but It might work.
I used a 1:1 ratio of fair skin and olive green for the flesh  hightlights..Its pretty bright and pallid looking not sure if the skin needs any more.
mixed in 2 drops of blackened brown with 1 drop of olive green and one drop of tanned shadow with 8 drops of water to create the trenchcoat shading wash . then used just the midtown blend to try and bring back the mid tones. It might need another thinned coat of midtone before highlights but I like the shadow color

Welp here he is so far.


zombie holmes continues

so heres Holmes fully basecoated I ended up using  a blend of tanned shadow and olive green for the overcoat.

I think i'm gonna try and use the same shading technique as used on Tsuko's pants from the LTPK #2 then build back to the mid tones since this seems like a nice mid tone color.

for the magnifying glass I'm gonna try and use a cool blue wash and shade the upper section gradually from ghost white then maybe a pure white line arcing along the left edge..

 I love that he's missing a shoe tho it might be obvious from this angle


Friday 18 October 2013

Empire of the Dead Kickstarter arrives

empire of the dead has arrived and I got an itch to try and paint up zombie sherlock and watson.
Its oct gotta do it :)

got them pinned and primed and started dark basecoat color of flesh on Holmes.
gonna build up some highlights after with some olive green mixed with fair skin..see how that turns out.
for the eyes I figured I'd just invert the colors..leave the socket black and do a white/green dot.
I think its ok..I can't imaging trying to add a pupil to that


Monday 14 October 2013

dain basecoating almost done

so got the rest of the basecoat applied to everything. Along the way i found out the mix of colors I used for the beard shadow color is virtually the same as ruddy leather..which is the basecoat color for the gold trim.(2 drops marigold yellow and 1 drop mahogany brown)so right now..it looks really brown.

i think i'll apply a layer of ancient gold before starting the detail layering. but ran out of time today.

im not sure about the flatten brush technique for the chain mail..it worked ok on the metal but didn't' work that great on the bones..just showed alot of surface defects and the shallower divots were much harder to not fill in..i think for chain on bones in the future it would work better just painting up the chain with honed steel with highlights and using a wash over it to shade the links.
It is much neater then drybrushing tho.

welp progress so far..


Saturday 12 October 2013

dain continues

I made some more progress on basecoating the Dain.
I used a blend of 2 parts marigold yellow to 1 part mahogany brown for the beard and eyebrows.
dusty skin for the basecoat of the fur and tanned skin for the basecoat of the horns. as well i used ultramarine shadow as basecoat color for the cloth pieces.
i did most of the base drybrush work trying for a crumbly granite dustly color.
I think i'll switch back to working on the steel layering next.

with the bones figure primed i don't mind painting it..tho i can tell a difference around the edges of things when painting..its the biggest difference..where with the metal the edges are sharper/deeper i find thinned paint will almost slightly flow to the edge of the metal and stop. Im noticing i can't rely on that effect with the bones to help keep my edges crisp..it could be just less definition..i notice this trying to paint the mustache under the nose especially..not a showstopper but its worth noting


bit messy looking but its just roughing out at this point..painting around and under the shield is definately not easy If i was going to start again id leave the metal shield on the sprew and just use a sculpting tool to pry off the glued in shield arm and paint it separately.


Friday 11 October 2013

ltpk 5 Dain

decide to skip second figure from ltpk4 for now and move onto the dain since i really want to compare painting a bones version to a metal version of the same figure. \i glued on the shield so painting both will be comparable experiences.
just got them both primed,lined and the base coat of the flesh done.
so far the slightly thinned coat of brush on primer seems to be working on the bones figure..tho i need to order some black so i can make some grey ..its very hard to tell the coverage over the bones


got the eyes on both done..and the teeth on the lower jaw.. very hard to try and make them the same 
got all the armour and steel bits basecoated with the ultramarine shadow and walnut brown..not sure if your suppose to do the inner shield with it but figured why not..think i'm gonna basecoat the whole thing before doing the highlighting...just seems like a good idea to me

Sunday 6 October 2013

bertok finished

after touching up the skirt shading and a couple spots on the axe handle and thumb I've gloss coted him and then dullcote
here he is..i haven't decided weather to brush on glosscote over the metal bits yet..i might to give them abit of a sheen again.


Saturday 5 October 2013

bertok metal shading and highlights

I ended using the algae secret weapon wash thinned down same as the armour wash and applied some glaze layers to the axe and armour.
after that tried using some thinned down layers of honed steel mixed with polished silver..then straight polished silver to try and build up the metalic highlights.
the last part I mixed in some pearl white with the polished silver ..that might have been a mistake it made the polished silver abit to white aand not as much metallic..but this was all an experiment into with trying to get better with metallic as well as the skin tones..overall Its better then the plain metalic then wash I have tried previously

So I think this is done..and its ready for some glosscote unless something stands out that needs more work.


Thursday 3 October 2013

bertok highlights and armor

I went back and applied another highlight layer to the leather straps..they seemed abit flat to me.
I then highlighted the pouch and sack, an eyepiece as well as cleaning up the beeds of the necklass and highlighting it and the medalion.
after that I tried to bring the tone of the axe handle back up then worked on the grey hair..I think its ok..tho in the back there were a couple spots where paint got into some crevices again and I might have to go back and clean that up..

I found a great article on shading TMM on coolminiornot and wanted to try and practice the concepts on the metal areas.
 http://www.coolminiornot.com/articles/1649

I simplified it abit and used secret weapons armor wash with a 1:3 ratio to additional water and then used it like a glaze vs a wash and used the same basic technique we were to use on the skin highlights in this kit but in reverse..starting at the bright areas and pushing the brush to the darker edges.(included a side pic so the shoulder piece shows what i mean better)
 I did that probably about 6 times and figured Id stop at this point and maybe do some more tomorrow or move to adding in metalic highlights. I do like the tone..but I got a nice aqua wash I could apply abit of to bring back some of the blue tint  as well..


ah well here we are..getting very close to finishing this one..


Wednesday 2 October 2013

bertok highlight work

Got a bunch more accomplished today I think..I highlighted the rest of the lonestar leather sections(wrists and loincloth).
After that I worked on all the straps and boots blending from ruddy leather to oiled leather for the hightlights.
as well did some highlight work on the rope bumps. then used some ancient gold then new gold to the necklass and the leather strap rivets.


Tuesday 1 October 2013

bertok fur and boots

i applied a couple tanned skin highlight glaze layers ot the top of areas of the abdomen and shoulders..its a slight change but I think it will do.

I then started working on the fur trim..I started doing a few layers of the tanned skin highlight colors then worked up to linen white
had some issues with to much paint on the brush running into the creveses so applied a thinned black wash to it and built the linen white back up.
I think the last layer might be pushing it to far..but I tend to hold back on them so figured ..why not and see how it goes..
would have been faster to drybrush the fur before doing the skin tho heh.

after that worked on the leather straps around the boots..using a blend of the lonestar leather and tanned leather for the midtone up to just tanned leather for the highlights....this one I didnt' lighten the paint for a last highlight..I was afraid it would be to much.

slow going painting everything thinned down so much ..but its good practice to find the right blend consistancy..